Showing posts with label gemstones. Show all posts

Sunday, June 17, 2012

Bracelet Tutorial- How to Create an Interlocked Wire-Wrapped Bracelet

This tutorial is for a basic interlocked wire-wrapped bracelet.
I absolutely love the durability of this bracelet. The interlocked bead links make it tough. This style is dainty but strong and makes a good anklet.
So lets get started!
Supplies needed- 
-About 2ft, 24 Gauge wire
-About 12-18 Beads depending on size and style.
-1 Clasp
-Wire snips
- Chain nose pliers
-Round nose pliers
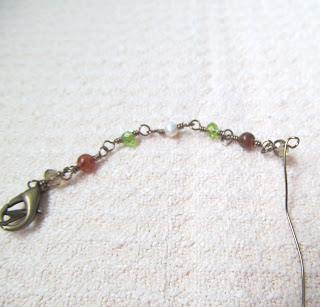
(I'm using 4mm raspberry aventurine, 4mm Fresh water pearls, 4mm green Czech fired rondelles,  4mm taupe Czech glass rondelles, Vintage brass wire, and findings.)

Because this is a two handed project, pictures were hard to do so I created a video instead.
Here's how to start the bracelet and create the bead links


Continue with the technique shown in the video creating and interlocking each link.
Add more....
And more....
And more links until you finally reach your desired length, my bracelet is about 7 1/2" long.
For the last link, instead of closing it off like the rest, just simply slide on the other clasp piece before twisting it closed.
And there you have it! A gorgeous bracelet that is dainty, yet strong. You can use any color or style of beads, any wire and clasp. This design has endless possible outcomes!
Hope you all enjoy and good luck on your project!
Next Week''s Project-
Simple, Stunning, Dangle Earrings

<3 Cassandra


Sunday, June 10, 2012

Nest Tutorial- How to Make a Bird's Nest Necklace

This Tutorial is for a wire bird's nest necklace.
I had a request to do a tutorial on a necklace, so I decided to chain the nest instead of earrings. It is just as easy to make two and put them on earring hooks. I love this project because eggs in a nest has such a wonderful meaning to a mother. 
So lets get started!
Supplies needed- 
-About 2ft, 26 Gauge wire
-3, 4mm round stones
-18" Chain
-1 Jump ring
-1 Spring clasp
-Wire snips
- 2 pairs chain nose pliers

To start, take your 3 beads (I'm using 4mm Charoite on solid sterling silver) and place them about 1 inch in on your wire.
 Curve your wire and beads to make a circle, and twist it closed. Tuck your end under on the side you want to be the bottom.
 Begin wrapping your wire around the 3 beads. This will form the base of the nest.
 When you have about 6-10 wraps, take your wire and connect your outer ring to your bead ring, by weaving the wire around the outer ring to the inner ring with the beads.

 Once you have 3 or 4 wraps connecting your base to your beads, begin working on the bottom.
Twist the wire round and round in circles. Make sure your circles are all different sizes so that they cover the whole bottom. 
 When it is decently covered weave the wire around the base and the beads like before, making sure to come through the bottom so that it is connected to the top. Do this 3 or 4 times.
 Your nest should then look similar to this.
 Now it is time to make the top of the nest. Kink the wire a bit and begin wrapping it in a circle on top of the base. Do this about 10 times.
 Then begin weaving the nest like before, connecting your top to the rest of your nest.
 Keep weaving around and around sloppily until your nest is full or you have about 3" of wire left.
 Create one last weaving loop, but leave part of this loop up and pinch it together close to the base. This will create your bezel.
 Bring your wire end up and wrap it around your pinched base until secure.
 Snip the loose end and pinch it down with your chain nose pliers.
 It should then look like this.
 Now to put our pendant on a chain! This part is really simple.
 Open the ring of the spring clasp by using your 2 pairs of pliers to grip the ring and turn them away from each other to open it.
 Place your chain on the clasp.
 Turn your pliers towards each other to close the opening.
 Open your jump ring, add your chain and close the same way you did with the spring clasp.
( If your spring clasp ring does not open, you will need a second jump ring to connect it to your chain.)

 And that's it! Your very own bird's nest necklace! You can customize it any way you like!
Birth stones, more eggs, less eggs, different metals...It's all up to you!
Sorry the picture is slightly blurry...I tried to enlarge it a bit...

Next Week's Project-
Basic Bracelet

Enjoy!!
<3 Cassandra

Friday, May 25, 2012

Ring Tutorial- Basic Spiral and Stone Ring

I've decided that every Friday, I would like to try to do a tutorial. I have quite a few friends and family members aspiring to learn some wire-wrap techniques, so I decided to start creating some basic tutorials to help everyone along. 
This tutorial is for this basic spiral ring with a stone in the center.
Supplies needed- 
-8 to10 inches 20 Gauge wire
-1 4mm round stone
-A ring mandrel (or some type of rod)
-Wire snips
-Chain nose pliers
To Start, take your length of wire and lay it across the number of the size that you need your ring to be.
Bending the wire in half around the mandrel wrap each side around once.
Add the stone to the top length. (Sorry the pic is blurry)
Bend the bottom wire up and the top wire down.
Continue in this circling motion around the stone until you are satisfied with the thickness or you start to run low on wire.
Remove ring from mandrel and begin wrapping the wire around the base of the ring, like so...
Once Wrapped 2 or 3 times, give the wire a snip. Be sure that the snipped wire is on the top of the ring and not near the skin.
Repeat on the other side.
Tada! Your ring is done! Now that was easy huh? These rings are wonderful to sell while vending, I usually charge about $5 a piece for these.


Next Week's Project- 
Beaded Wrapped Stone Ring
Have fun! <3 Cassandra

Thursday, May 24, 2012

I have a bead (and wire) fetish

I'm so excited! I found an awesome place online that sells recycled solid sterling silver wire! Not only is it recycled but it is made in the U.S.A. and they buy back scraps! Heck Yeah! That made me one happy camper. They also sell gold filled and solid gold wire, but for now silver is the next step up in investment for me.  I took the plunge. 50 feet of chain, 100 marked silver clasps, jump rings, 30 feet 26g wire, and 5 feet 16g. ^_^
So now that I have all of this awesome sterling silver, I need to figure out what types of trees I am going to make with it all.... That is the fun part....The beads! I have a slight bead fetish. Every time I get an idea, I buy beads. Every time I am near a craft store, I buy beads. Every time I am online, I always start to browse, and do what? Buy beads...Dear lord, I am a true bead-a-holic... roughly 13,000 beads here... hehe ^_^;;
Hey, it could be worse! I have been trying to control the urge and use up a bit of my stock recently...but now that I have all this new wire, who knows how long I'll hold out. Anyone got the number for Bead-a-holics Anonymous?