Sunday, June 30, 2013

DIY Fabric Labels

A super simple, step by step guide to making your own fabric labels!
(These instructions use Microsoft Word and Paint)

Supplies Needed-
An inkjet Printer
1 Package T-Shirt transfer paper
Scissors
Ribbon (Your choice of thickness, polyester or cotton works best)
An Iron
Fray Check (optional)


Step ONE- Create your label.
First select your business image or logo (All text works best but you can use a simple image/decal as well)

Here's mine-


Open your Image in Paint-
If you want to make a single sided tag all you will need to do in this step is reverse your image. 
You can do that by going to the top right corner under rotate, click flip horizontal.

If you plan to make a double sided tag like me, you have a little more work to do. 


You will need to rotate your image one more time to the LEFT. Save as Image 1.
You will then have your 1st image that looks like this.
For a single sided tag- ( You can now move on to Step Two)

For a double sided tag  it should look like this-
 For double sided (folded tags) we can start on the other side
The other side can include your website, care instructions, or just be plain, the choice is yours. I personally wanted to put care instruction on the other side of my folded tag.


Open up a new paint and have a blank canvas that is roughly the same size as your previous image-


Open up a text box and type in your care instructions, add your website, or what ever you want the back of your tag to say. You could also insert another image.
To open text click on the A in the upper left hand corner, then click on your photo. I suggest using size 8-9 font and an easy to read text like Times New Roman, Calibri, or Arial.


Just as before flip your image Horizontal, then flip it to the RIGHT. Save as Image 2


Your final back image should look like this-


Step TWO-
Open up Microsoft Word
Go to Page Layout>Margins>Narrow.
This will allow us to put as many labels on our sheet as possible.


Go to the top left again- Insert>Picture>Image1
For double sided labels add your second image- Insert>Picture>Image2


Now we need to make sure our labels are the proper size. 
Click on your image to select it.Click the tab that says 'Picture Tools' format.
On the far left adjust your size to fit your ribbon. My ribbon was 1.5 inches wide so I made my images 1.3 inches tall.

Hold the Ctrl key and hit A this will select your images. Hold the Ctrl key and hit C. Click to the right of your images, hold the Ctrl key once more and press V.  


(Crtl A= Select all, Ctrl C= Copy, Ctrl V=paste)

Copy and paste your images until your page is full of labels.


Our labels are ready to print! Do a test run on regular paper first to be sure your labels are the right size and are what you want then print out onto your t-shirt transfer paper. Since we already took the time to mirror our image all you need to do is hit print! :)

Once your labels are printed, cut your strips and iron them to your ribbon following the instruction that came with your transfer paper. 


When the labels are cool cut them out and fray check the ends so the ribbon does not fray apart. 
Allow them to dry and store them until ready to use! 


Enjoy your labels!!!


<3
Cassandra


Friday, June 21, 2013

What is a Nursing Necklace?

Since June 7th, Nursing necklace have been a new featured item in my shop and I have had many ask me, "What is a nursing necklace?" That's a great question!

A Nursing Necklace is simply a stylish necklace that can withstand children.

Around the ages of 3-4 months babies start to notice more about the world around them. They begin to reach, rub, pull, and pinch what they are close to. Most of the time, that's mom. A nursing necklace is something for little ones to safely explore, aka pinch, pull, and during teething phases, nibble. Nursing necklaces are great to wear while breast-feeding, bottle-feeding, wearing baby in a sling or carrier, or even just because they look nice.

They make great gifts for new moms!

What types of nursing necklaces are there?
There are many types of Nursing Necklaces to suit a wide variety of styles!
First, there are the kind I make, Gemstone Nursing Necklaces-


Gemstone Necklaces usually have a gemstone focal. Some, like mine, are also beaded up the string. (My little guy is a pincher, so he likes to roll the beads inn is fingers tips.) Many moms like gemstone necklaces  not only because of their unique and beautiful focal, but often for the metaphysical and healing properties that are said to resonate within the stone. Each stone has different properties.


Next, there are beaded Nursing Necklaces-


Beaded Nursing Necklaces are just that, nursing necklaces that are all beads. They are usually made from wood, but may also be made of bone, glass, resin, crochet beads, fabric over wood, or gemstones.
 
Are they Safe? A majority of Nursing Necklaces are made with safety in mind. Colored beads are usually made with non-toxic dyes and wood beads are finished with non-toxic waxes. Beads are TIGHTLY knotted in and cords can usually withstand 20+ pounds of pulling.

(Click photos to visit their shops!)


Lastly, we have an example of a Teething Ring Nursing Necklaces,


A teething ring necklace is just as it sounds. A necklace with a teething ring. The rings are usually a natural undyed, unwaxed, wood. Some only have a ring but many are also beaded. Great for little ones who are teething and going through biting phases. (These two are an example of crochet beads and fabric over wood beading.)


Many Nursing Necklace are adjustable, either with sliding knot closures, or ties, the mother can wear a majority of them at any length she chooses.

So I encourage you, if you are a mother, know someone who is going to be a mother, a grand-mother, or just love some of these unique styles, click the photos and check out the shops!


<3
Cassandra

Sunday, April 21, 2013

Plans for a portable, light weight, chicken run for less than $30


What do chickens have to do with jewelry? Absolutely nothing. I just love my chickens. I mean common, they're adorable! Their names are Applesauce (left) and Puddin' (right) and we are going to be getting 2 more ladies to add to our family this Tuesday! They live in a cute little coop with a marigold garden and they LOVE to eat fresh grass.

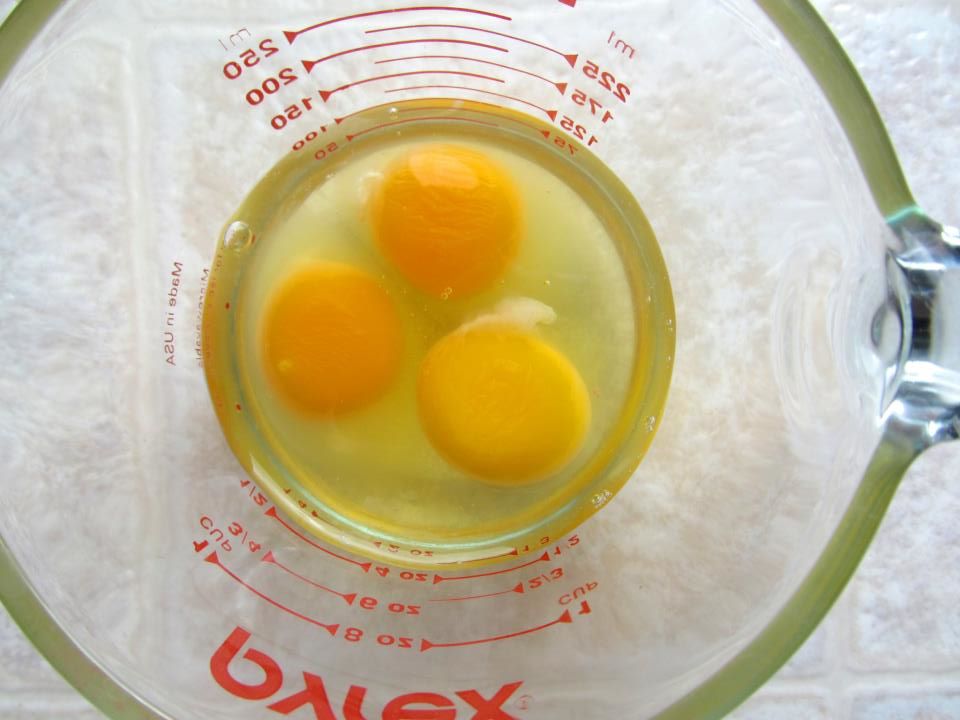
Grass and bugs are SUPER important to a chicken's diet. Every time I see egg cartons that say, vegetarian  or grain fed, I want to roll my eyes in annoyance. Chickens aren't vegetarians, and the last thing I want my chicken eating a ton of is grain! By nature chickens eat lots of bugs, grass, seeds, rocks (yes rocks, they need those to digest their food!) berries, and other random things that they may find while scratching about. What they eat makes a difference in the quality of their life and the quality of their eggs. A happy healthy hen lays eggs with nice dark orange yolks and a great egg-y flavor, while a cooped up grain-fed hen produces light yellow yolks with very little taste. See for yourself!

The top two on the right are my girls eggs and the one on the bottom left is a store bought, grain-fed, free-range, organic egg. (lots of fancy labels don't equal good quality!) At this point you may be thinking... wait, wasn't the title of this post how to make a portable chicken coop? Yes, yes it was. I just felt it was worth mentioning, that whether you are an urban farmer like "I like to think" I am or a farmer with lots of acres and a big operation, I feel it is important to know the value of giving hens the basic primal need of bugs and pasture.
So here it is, a photo of our inexpensive, lightweight and easily movable run.

It is constructed from very inexpensive materials that you don't need to worry about going bad in the weather. I have built other versions of portable runs before, including wooden collapsible ones, and they just don't seem to hold up to the weather, they are time consuming to make and cost a fair amount of  $$$.

So here are the instructions, (thanks to my wonderful and awesome husband) including the pricing and cut list.
(click the photo to make it bigger)

The run is made from 1/2" PVC piping and 24" wide chicken wire held on with zip ties.
It measures 2 feet tall by 4 feet wide and 5 feet long.
Husband says it is self explanatory  but if you do have questions or need more through instructions just leave a comment! We would be happy to answer any questions!

Happy grazing!
<3 Cassandra

Wednesday, December 26, 2012

Announcing the winners of The Win a Doula GIVEAWAY!!! Woohoo!


First off... I cannot BEGIN to express how hard it was for me to choose the winners of the doula giveaway. Every single woman deserves a supported birth and those of you who did not win, I still encourage you to seek the support!

And the WINNERS are....
*drum roll*

Rebecca Lane & Jenelle Walter

Rebecca Lane- I would love a doula for the birth of my baby due Feb 27th. We are working hard to find a way to afford one. My pregnancy has been a mix of fear and blessings. I have a wonderful 7 year old daughter and I lost a son (born too early due to a placenta abruption) in 2008. I am very excited to be pregnant this time and it was a huge step for me to try again. I was given the green light by specialist to "try again" and was able to conceive. I found a midwife and was so excited to have my first home birth and I loved my midwife. I was considered low risk despite my loss and a mild bleeding disorder. Everything was going great until 20 weeks we were diagnosed with Oligiohydraminos and began the spiral of medical expenses and doctors. I had to stop the plan of a midwife and begin appts with an OB and a Fetal Maternal Specialist. ALL of my free money (plus money I don't have) goes to co-pays, doctors visits, specialist visits and now since January is coming my $600 deductible is due. Just last month we had to pay an extra $1,000 to my doctor's visits and copays (in addition to our normal living expenses). My husband and I both work full time and he is doing everything in his power to make more money and he is doing great, but every dime goes to the doctors and specialist. At this point, I fear I can't even buy Christmas. I want so bad to have as close to a home birth as possible in the hospital and I know the only way I can is with a doula. I have been praying for a way to not only afford all my medical, a doula, but to even be able to buy the things I need for our baby due soon. So far, we have nothing. We could be giving birth in as early as 6 weeks from now. The Specialist is talking about needing to induce me so he can do an amnio-infusion to cushion the cord to help prevent a still birth and that me going into natural labor is dangerous. I have met with a doula and want one so bad and know how beneficial they are. I know that being induced is much more painful than naturally going into labor and I am scared of managing the pain myself. I am a huge advocate for natural childbirth and breastfeeding. It would be a dream come true to find an answer to afford one. I am keeping faith that no matter what, her needs will be met and we will be fine.  I may not be the best choice for this gift and I pray it goes to whoever really needs it the most. Thank you for the opportunity to apply for this amazing gift!!

Jenelle Walter-   My first son was born 4 years ago via C-section. 2 years later, we became pregnant and knew we wanted a hands off VBAC. We ended up losing our second son at 20 weeks gestation due to issues with the placenta. We were devastated and had decided that we didn't want more children. Then to our surprise, I became pregnant with this child. I hired a midwife and planned on giving birth to him in a freestanding birth center with a doula and my immediate family present. We have recently learned that our third son will be born with a congenital heart defect known as tetralogy of fallot, meaning not only will I have to deliver in the hospital but also a state away closer to the nearest children's hospital. (Seattle Childrens.) If that wasn't enough, soon after the diagnosis, my husband left us. I am still wanting to push as hard as I can for a natural labor for among other reasons, the reality that our son may likely be whisked away to the NICU and even a different hospital. I would really love the option to follow close behind. I have the support of family, but would prefer to use those resources to help with my 4 year old. I can no longer afford a doula due to the divorce and my inability to find work at 28 wks pregnant after being a SAHM, but feel that I would benefit greatly from some support now and during labor. I hope that after my son's surgeries, I will be able to study to become a doula myself.

Both of these women have suffered loss in their previous pregnancies and both of these women have a hard delivery on their hands. Let's give these women, all the good birth vibes, support and love we can send!!
Congratulations ladies! I can't wait to watch your stories progress and help you get your doula!

<3 Cassandra

Thursday, July 26, 2012

Oh to catch some Zzzz's


I really haven't forgotten about my blog, the contrary actually, I have been wanting to get on here quite a bit and share all the various things that are happening yet, finding the time seems almost impossible.
In the past few weeks we have been out of state and out of town at least 6 times, I signed up to help coordinate and be a spokes person for Improving Birth National Rally (yay!), I have designed a few new pieces, created over 15 custom orders on top of creating at least 10 made to order trees, all while keeping up with my home responsibilities. Between all the emails, letters, orders, kids and cleaning my blog took the back burner.

My blog is not the only thing that seems to be sitting on the back burner, I don't think that I have taken enough time for myself in the last 3 weeks at least. I did get my hair cut....while nursing a fussy baby under my cape...Everyday I feel exhausted and my house and health are taking the toll.
1. I know I need to drink more
2. I know I need to eat more
3. I know I need to sleep more
4. I need to take time to breathe.

Right now I am lucky, A.L. is sleeping and A.S. is watching Diego....it is a rarity that my four year old sit and watch anything....I am enjoying my 18 minutes of peace.

I definitely don't want to get burnt out, so I decided that I am going to take a vacation in August. For one week, no internet, no facebook, no T.V.....just me and my family. I plan to work on new pieces, go on a few hikes, maybe a massage, just a little time to catch some R&R. I wish I could have some other momma's join me, I know I am not the only one who needs it!!! 


Wednesday, July 4, 2012

Here's the "Giveaway" Scoop


SO the month of July is going to be full of giveaways, one almost every week of the month. Not just a little thing here and there....these giveaways are going to be big! So, to get to the good part.... What is Home Baby Crafts giving away?

*Drum roll please*


Week One (7/9-7/16)- For the Mommas- 
-1 Mother child Pendant (Customizable to include your children's birthstones)

-1 $10 Starbucks giftcard, for when you sneak in that get away or just need a coffee break.

-1 Handmade Cold pressed soap and Bath Bomb, Handmade by Stephanie of Cable Avenue Co. in a beautiful Apple   Blossom Scent. ( This is my absolute favorite soap, my skin has never felt or smelt so good!) I mean what momma doesn't enjoy a nice hot bath and soaking away the pressures of the day? Ahhh....

-$20 in free prints, promotional card from Shutterfly, print off some pictures of your adorable children!

-1 50% off coupon on any Home Baby Crafts item or custom order.

Oh yeah!!!!!

Week Two- (7/16-7/23)- Doulas ONLY!
- Doula Abstract Pendant <3

-1 copy of Ina May's Guide to Childbirth (paperback) to include in her lending library.

-A free 30 minute massage from a local massage clinic to use in the month of August (Value up to $50)
       -The winning doula will pick the facility and I will take care of the rest!-

-1 50% off coupon on any Home Baby Crafts item or custom order.

Doulas are always comforting mommas and I figured they deserved a little TLC back!

Week Three- (7/23-7/30)- Midwives ONLY!


-1  Midwife Abstract Pendant

-1 Handmade Scale Sling for weighing those cute bundles of joy! (yes, made by me) :D

-A free 30 minute massage from a local massage clinic to use in the month of August (Value up to $50)
       -The winning midwife will pick the facility and I will take care of the rest!-

- Framed Natural Mother Birth Art. Who doesn't love awesome office decor? (...and yes another gift made by me!)

-1 50% off coupon on any Home Baby Crafts item or custom order.

Shew! That's a lot of giveaway!! I can't wait to get them rolling! I plan on using rafflecopter for these giveaways so that entrants can earn as many entries as they want! All I ask in return is a little "linky" love to my FB page. <3


Friday, June 29, 2012

Ring Tutorial- Easy, Solitaire, Flower Blossom Ring

This tutorial is for a easy, elegant flower blossom ring.
I love how easy this ring is to make. It is dainty, elegant, and so pretty, yet it uses hardly any supplies! A 3" headpin can make up to a size 8 ring. If you need a bigger size, you can use wire with a flattened end.

Supplies needed- 
-1, 3" Long Headpin
-1, 6mm Rondelle
-1, 10mm Filigree (or Leafy) StyleBead Cap
-Wire snips
- Chain nose pliers

I'm using  a 6mm, Topaz  crystal rondelle, a 10mm Blue Moon Beads "Frosted" silver bead cap , 
and a silver plated 3" headpin.

Let's Get Started!
First string your bead onto your headpin.
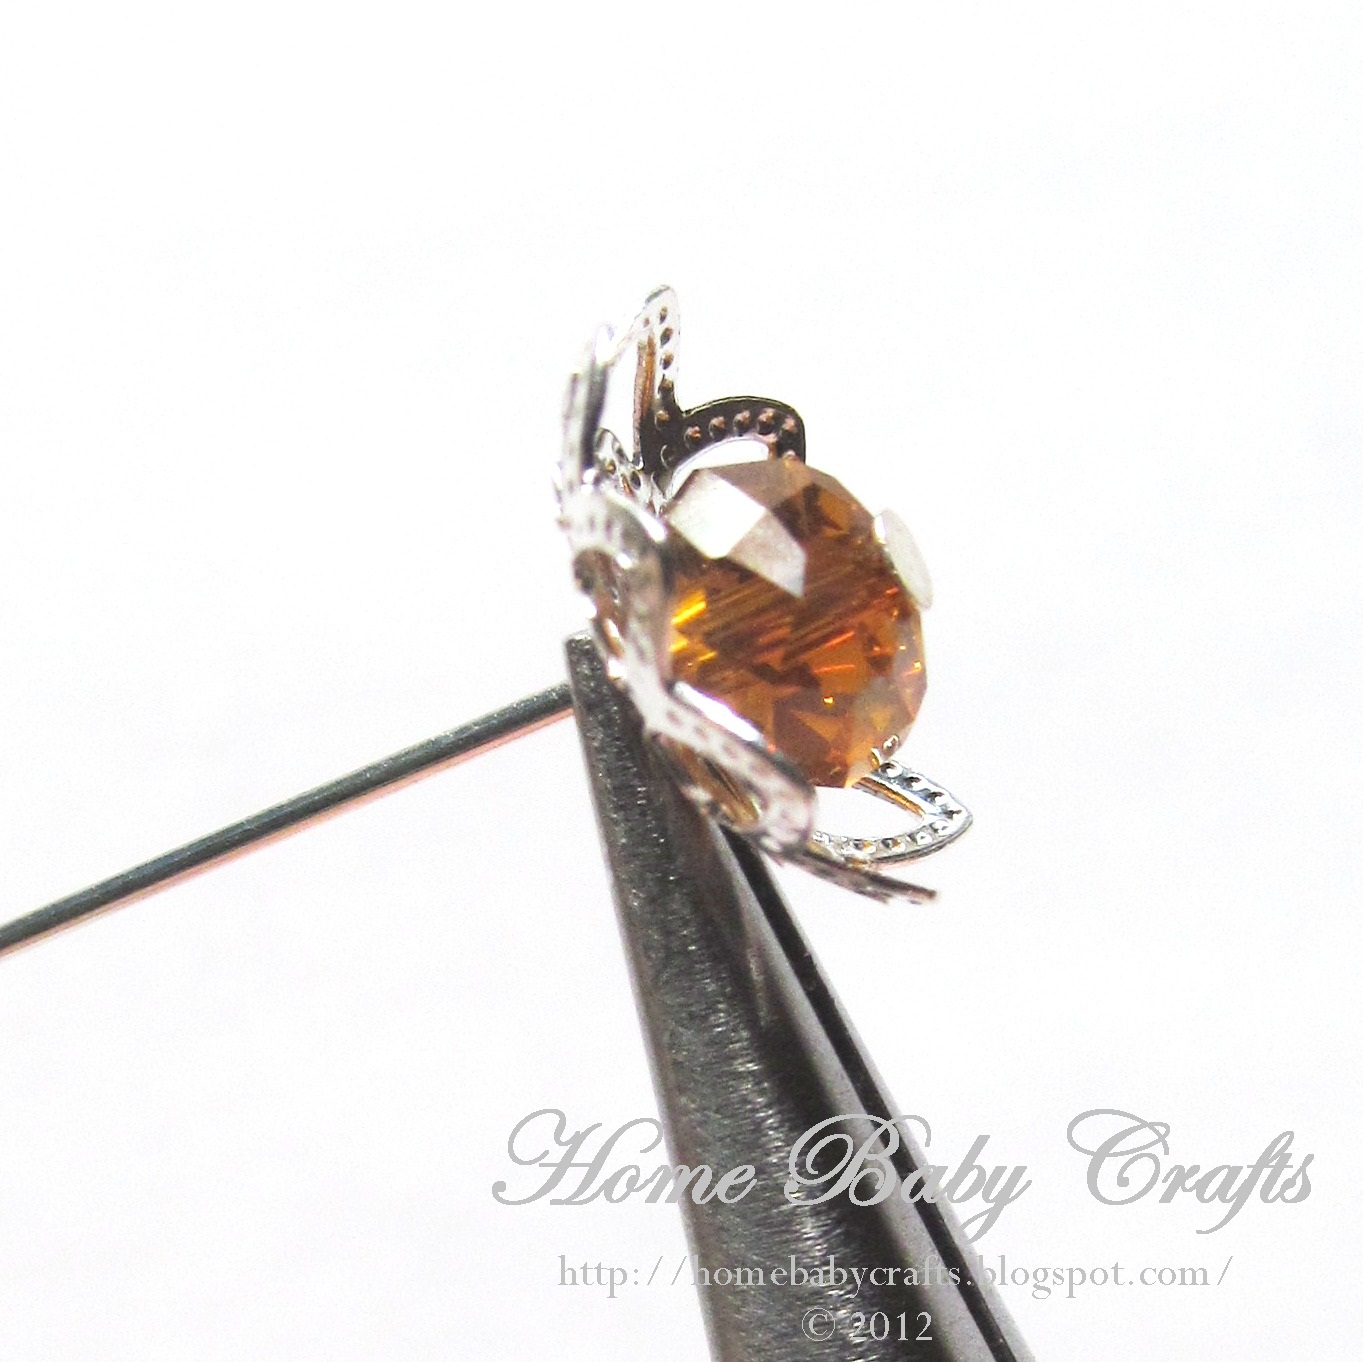
Then string on your bead cap, facing it towards your bead.
It looks like a pretty flower!
With the smallest edge of your chain nose pliers, grip the bottom of the "flower". 
Get as close to the "flower" as you can. 
Make a 90° angle. This creates our base.
Place the ring on the mandrel according to the size you need and wrap the pin around the mandrel.
Pull your ring off your mandrel and you will have the basic shape. 
While maintaining your shape, bend your tail around the base.
Using your chain nose pliers continue wrapping the tail up towards the bottom of the "flower" until the bead and cap are secured tightly.
Give the tail (if there is one) a snip.
Press in the clipped edge with your pliers.
Place the ring back on the mandrel and stretch it slightly so that it holds a firm shape and is perfectly round.
And you are finished! You made your own Flower Blossom Ring!
Aren't they Pretty!
Hope you enjoyed your project!
See ya next Friday when we make a...
Native American Dream Catcher Pendant

Enjoy!
<3 Cassandra